After making a search, Edvisor allows you to create digital and fully customizable dynamic quotes to engage your students and offer them different study abroad plans.
All your created quotes are stored in the Quotes section. You can access it by clicking "Quotes" from the left-side menu of your Edvisor account.

In this article:
- Understanding the quotes section
- Understanding a quote
- How to customize the appearance of your quote
Understanding the Quotes Section
Within the Quotes section, you'll see a list of all the quotes generated by anyone on your team, along with some key information that you can see at a glance:

- Eye icon: Indicates whether the student has viewed the quote or not.
- Student's name: Quotes are linked to the student's profile.
- Status of the quote: There are different statuses available:
- Draft: The quote has been created but not yet sent to a student.
- Issued: The quote has been sent to the student.
- Accepted: The student has accepted one of the quote options.
- Expired: The quote's expiry date has passed without the student accepting any options.
- Assigned to: The counselor in charge of this quote, usually the person who created it.
- Issue date: The date when the quote was sent to the student.
Quote Filters
To find a specific quote, you can use the available filters and filter the quotes list by:
- "Assigned to" - filters your quotes by counselor
- Country
- City
- School
💡 You can also find a quote assigned to a specific student by opening the student's profile in the Students section.
Understanding a Quote
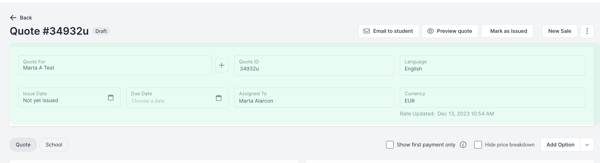
When you open any quote, you'll see the quote generator tool that allows you to make all the necessary edits to your quote to get it ready to be shared with a student.
It is divided into four main parts:
1. Quote "Action Points"

At the top of the quote, you'll see different buttons that allow you to perform various actions with the quote, such as:
- Send your quote to your students
- Preview your quote - See how your students will view the quote you are creating.
- Start a Sale - Begin preparing the student's journey.
- Start an Application - Send and process the application with the school through Edvisor.
- Delete the quote: Click on the 3 dots icon to see this option.
- Save the quote as a template: Click on the 3 dots icon to see this option.
⚠️ Applications are only available once any of the quote options have been accepted by the student. We also recommend doing this before you start a Sale.
2. Quote Setup Options:
You'll also see a first block with different fields to complete the setup of your quote.
3. Course Options:
Scroll down to see the programs you added while creating the quote, listed side by side. Edit them to:

By clicking on the 3 dots icon next to each quote option you'll also be able to mark one option as favorite, delete the quote option or duplicate it.
4. Notes:
You have the option to include notes with comments for the student – whether it's extra details about exchange rates, the quote's expiration date, guidance on how to select their preferred option, or anything else!
You'll see the notes at the very bottom of your quote.

Customize the Appearance of your Quotes
When clicking on the quote preview button, you'll see how the students will view your quote.
From your office settings, you can customize the appearance of your quotes to match your branding.