Once you've completed your search and narrowed down the list of courses that match your criteria, the next step is to create a personalized quote for your potential student.
In this article, we will show you how to:
🔹 Create a new quote
In the search results, you'll notice an 'Add to Quote' button next to each course option.
Simply click on it for any course you want to include in your quote.
- Click 'Add to Quote' next to each course you want to include.
- Then, click on 'New Quote'.

This action will generate your quote with the program options selected. You can access and edit your newly created quote anytime from the Quotes section.
🔹 Set up your quote
The next step is to finish setting up the quote and make all the necessary edits for it to be ready to be sent to the student.
✔️ Assign your quote to a student:
You should always assign your quotes to an existing student by typing the student's name in the "quote for" field.
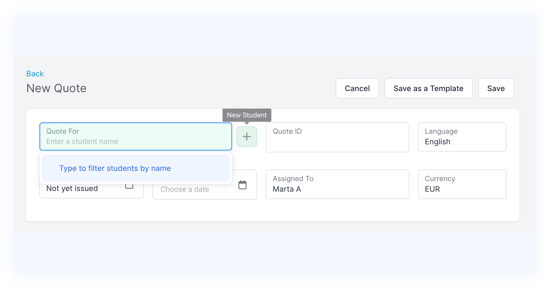
💡 If the student hasn't been created in the system yet, you can easily add a new student profile by clicking on the plus "+" icon directly from this window.
✔️ Add the quote language:
Choose the language in which the student will receive the quote information.
✔️ Set the Expiration Date:
Set the expiration date for the quote. The system allows you to set a validity period of up to one month for each quote.
If the student wants to accept one of the quote options after its expiration date, you'll have to generate a new quote to ensure that the pricing and promotions included are still valid.
⚠️ Important: Always check the expiration dates of promotions for each option in the quote before setting the quote's expiration date. This ensures the prices you offer are accurate.
✔️ Set the quote owner
Select the advisor responsible for this quote by entering their name in the "Assigned to" field.
✔️ Choose the Currency:
Choose the currency to display the prices.
ℹ️ Note that the prices will automatically be shown in both, the school's local currency, and in this secondary currency of your choice.
Add extra services
You can easily modify each quote option in the quote by clicking the 'Edit' button.

Here, you can add extra services such as:
- Accommodation: Choose from a variety of accommodation options provided by the school, select from your pre-saved accommodations, or fully customize for a unique offer.
- Insurance: Add insurance options available through Edvisor. This action will bring up the insurance search tool pop-up, helping you quickly find and include the best insurance option in your quote.
- Add-ons/Extras: Incorporate additional services offered by the school, such as transfers or extra fees, include your own extras, or create a new one specifically for the quote.
- Fees: Display any extra fees you’ve added to your platform, such as visa fees or agency administrative fees. Custom fees can also be added here if they haven’t been pre-loaded in Edvisor.
Add deposits and/or payment plans
You can also include deposits and/or payment plans to give your students flexible payment options.
⚠️ Extra services and payment options are added to each quote option individually, not to the entire quote. Remember to save your changes and repeat the process for each option in the quote.
Include additional Notes
You have the option to include notes with comments for the student – whether it's extra details about exchange rates, the quote's expiration date, guidance on how to select their preferred option, or anything else!
💡 Use note templates!
To streamline future quotes, you can save your notes instead of rewriting them each time. Just write your message and click 'Save Current Note'.
To use a previously saved note, click 'Use a Saved Note' and choose your template.
Once completed, click 'Save'.
🔹 Preview your quote
To preview how your quote looks, simply click on 'Preview Quote' at the top right of your page. This feature allows you to see exactly what your student will see.
.png?width=550&height=289&name=KB%20-%20Preview%20Quote%20(2).png)
⚠️ Make sure to review all the details before sending.
🔹 Share the quote with a student
After ensuring that all aspects of the quote are correct, it's time to share it with your student.
⚠️ Important!
Regardless of the method used to share the quote, always send it via email as well. This ensures that the system recognizes the quote has been sent, changing its status from 'Draft' to 'Issued'.
Share via Email
You'll find the option 'Email to Student' at the top of the page. Click on it and fill in the necessary details to send the quote directly to your student via email.

The system automatically loads the student's email address. You also have the option to add a CC email, send a blind copy (BCC) to yourself, attach files, and choose the subject and body of the email.
💡 Pro Tip: Use Email Templates
To streamline the process of sharing quotes, we highly recommend creating an email template. This way, you only need to select 'Templates', choose your pre-set template, and send it.

Check with your administrator to set up these templates.
Share the Quote as a Link - via WhatsApp or Other Channels
In the quote preview, you'll find the 'Share Link' option.

Clicking on it generates a URL linked to your quote, which you can then share with your student via WhatsApp, Facebook Messenger, or any other channel.