In this article, we will go through a simple sales flow from a new Lead to sending and confirming Quotes.
Each step covered in this series of articles is also a standalone topic in and of itself - in this article series, however, the focus is to walk through a typical chronological workflow from receiving a new lead to completing a sale, and submitting the booking to your provider. Part 1 covers course search and creating/sending quotes.
I. Create / Receive New Leads (Students)
- New Leads
Students can be generated either manually or through your Marketing forms. A great place to start if you are new to Recruit is reading about adding Student Profiles, and Forms.
Required fields are indicated by (*) and must have a value entered before a Student can be saved. Admin users can customize the list of required fields, find it in 'Company Settings > Preferences & Misc'. - Add the Student to a pipeline.
Once you have the Student profile updated with as much info as you can, you can then consider adding them to a Pipeline. Here, you will also want to consider filing any Custom Fields to include on the profile. Custom fields are connected to specific pipelines and will appear according to the pipeline movement. For information on pipeline creation and
To move the Students through a pipeline, look for the 'Pipeline' field and select one from the drop-down menu from the 'Summary' or 'Information' section.
Then, on the same 'Summary' section, you can either click on a specific pipeline step (sale status) or select a step from the drop list in the respective field.
Or, click and drag them to another step when viewing it in 'pipeline view' of the whole Student Pipeline:
If a counselor action exists that will trigger a pipeline sale status (step) movement, you will notice a small button appear on the Summary page, under the current status:
- Create a Task reminder.
Next, use tasks to set reminders for yourself or any of your team members. They can be manually from a Student Profile or the main Task icon in the header - or, created from an automation rule.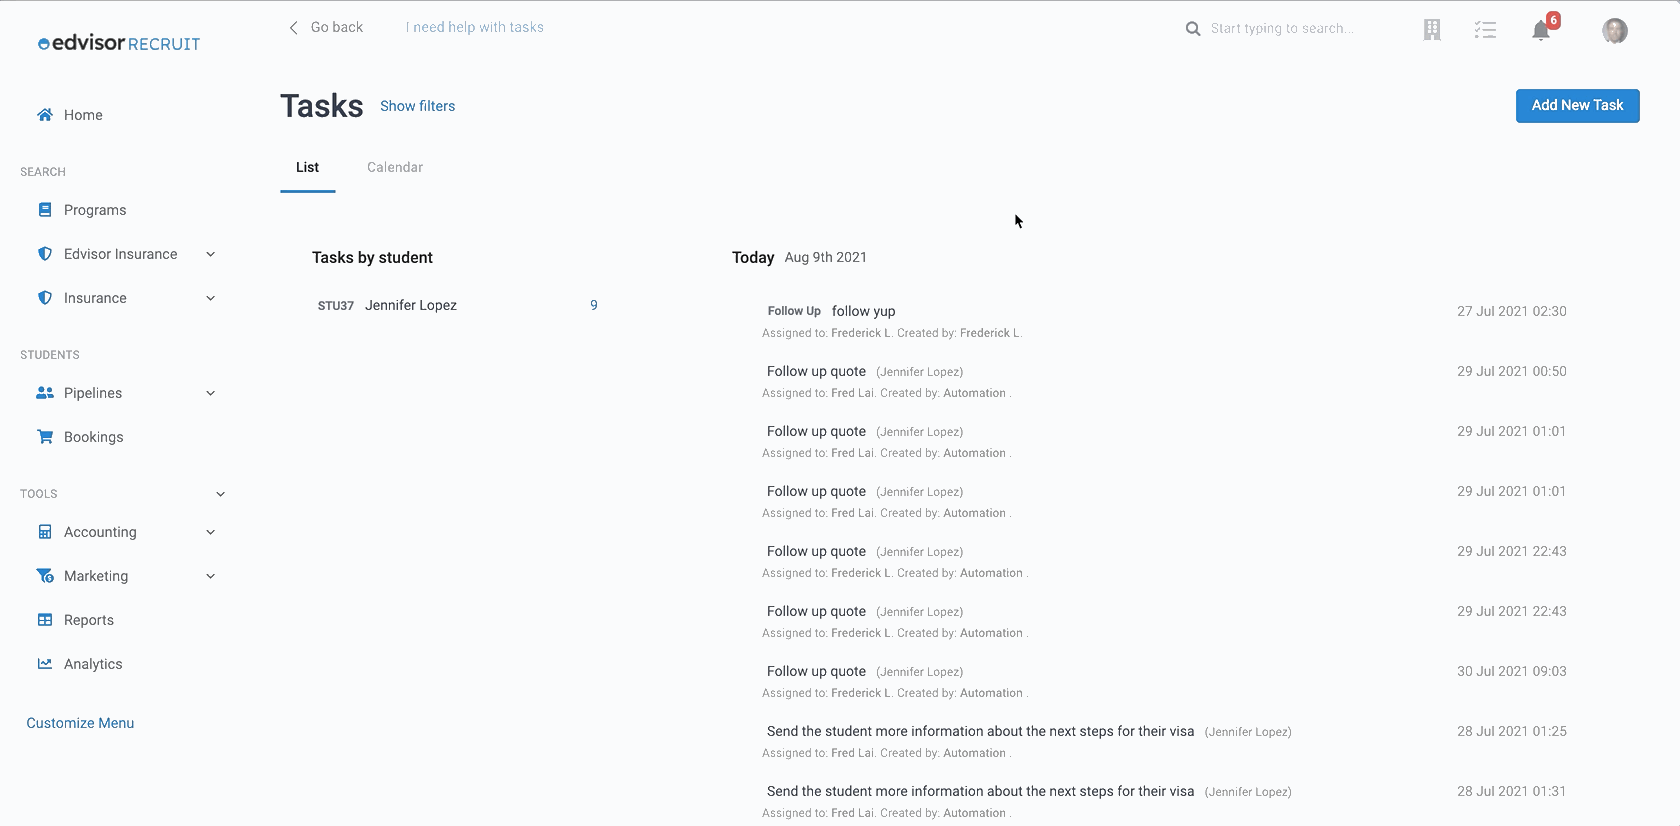
Alongside the title and main details, select a task type, due date/time, and duration of your tasks. Team members will get an email notification immediately when they are assigned to a task. For detailed information about task creation, read more here: Create tasks for you and your team.
We highly recommend:
- Creating Segments that allow you to automatically group your Students into buckets that can be used in automation rules. Read more about Segments here.
- Using Forms to auto-collect new lead data directly from your website. Create a custom form and simply paste the embed code on your website, to retrieve data directly into Recruit. Read about how to create Forms and Embed them here.
- Implementing Automations to build rules that create new tasks, triggered by specific events. For example, A counselor sends an email to 'Student A', triggering the pipeline step to auto-update and create 3 new tasks, to be completed. Read about how to create Automations here.
II. Create and Send a Quote
- Add a new Quote. From the Student Profile, click '+Add' to expand the action icons and select 'Quote'. You will be asked to select a template, create a new quote, or continue editing an active quote. Read more about Templates.

By selecting 'Create a new quote', you will be taken to the Programs Search page. -
Search for Programs. Use the search fields to narrow down the programs you want to view in the results. Click the 'pencil' icon to reveal more search fields.

- Select programs from the search results to add to a quote.

- Confirm the Student or re-assign. Each quote must be assigned to a Student to be created.

- Add more courses to your option, or add more options to your quote, as needed. You can manually add more courses or search for courses to add to your new quote.
- Insurance options will appear here, to include on the quote. Use the mini-search and quickly add one of the offerings. Your insurance agreements will determine what options are available here. To add insurance partners to offer, please contact your Edvisor account manager.

- Select from your 'Agency Services' or create custom services to add to your quote. You can also add School services that are offered.
- Edit any fees that you've added to the quote. Click the three 'dots' to expand an action menu and select 'Change prices/fees for any course, accommodation, or service you add. Insurance prices are set according to your agreement with Edvisor Recruit and cannot be modified from here.
- While editing fees you can break up each item into installment payments. These will then be reflected on the quote if 'Payment Plan' is turned on for the quote.

- Toggle the layout and language; adjust the currency rate and expiry date. These settings can be used to fine-tune the quotation for your Student.
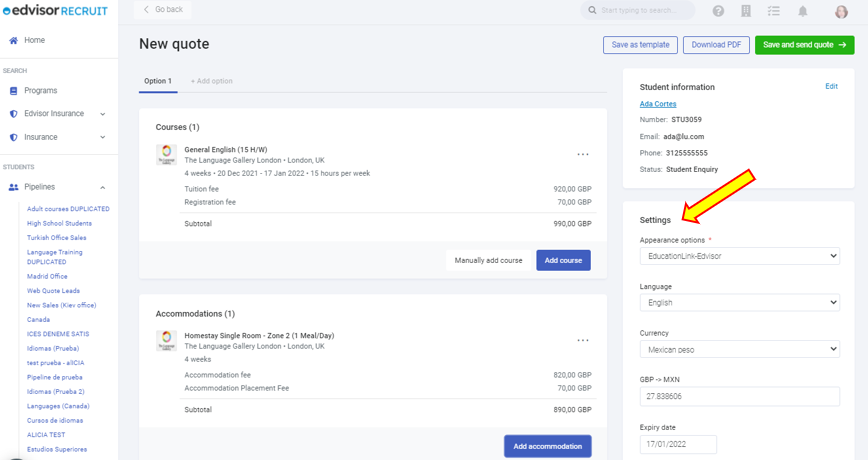
- Include any Notes that you want to share with the Student when viewing your completed quote.
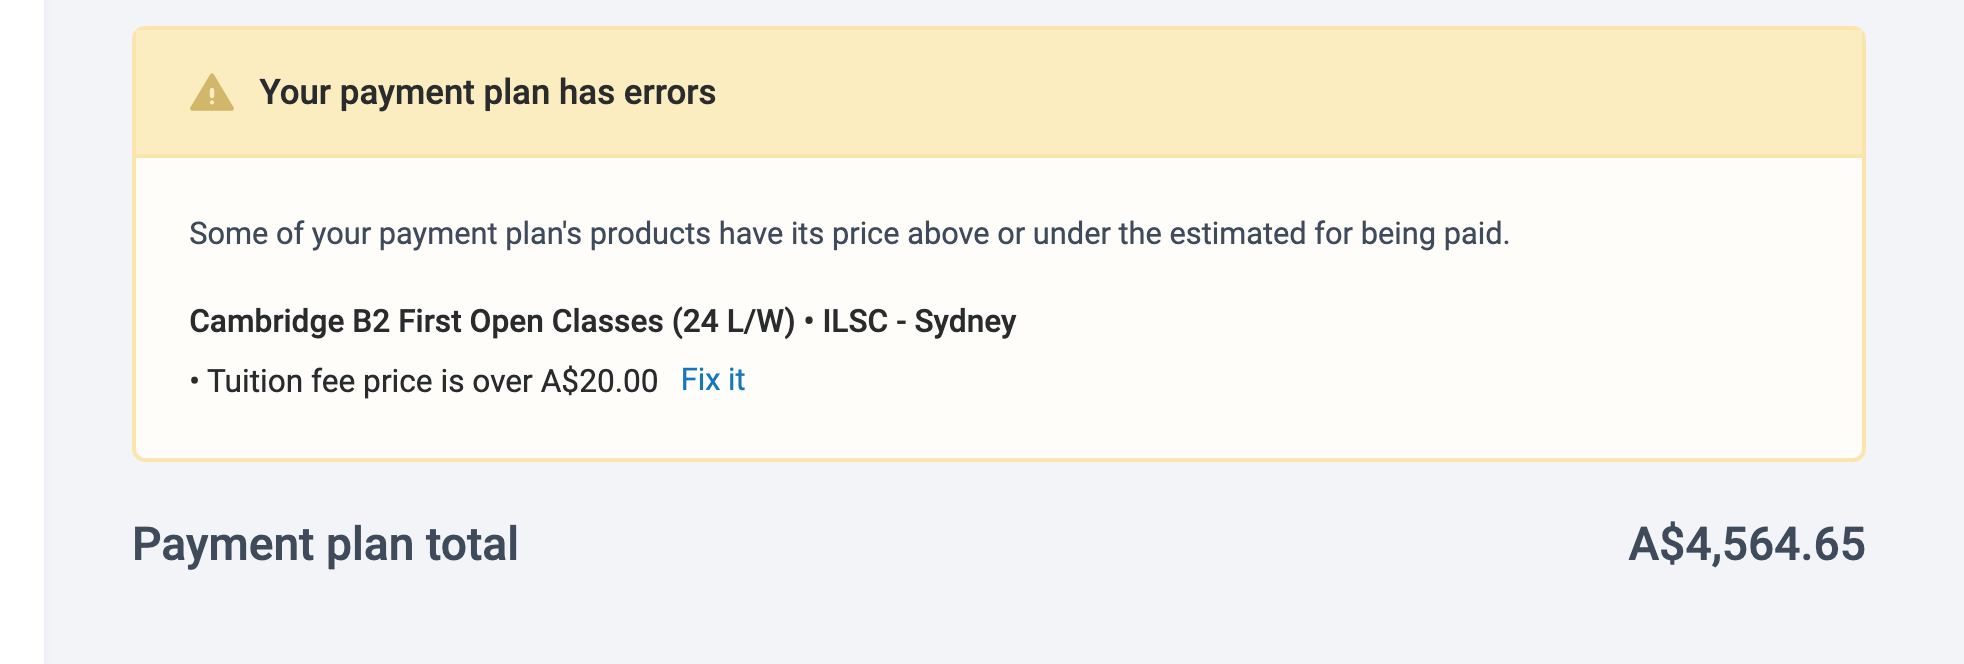
- Finally, if requires, add a Payment Plan. You can select the number of payments that you want to add, as well as edit and change any of the installment payments. An error message will appear, and you will not be able to save the quote if the total of the installments does not match the quote total.

- Save and send the quote. Or, download it as a pdf file. You can also send the quote in several ways:
- Direct Quote URL (send the link)
- Email direct link to Student
- Open and send Quote URL from Instant messaging apps: Whatsapp, Line, WeChat
- Access via Student Portal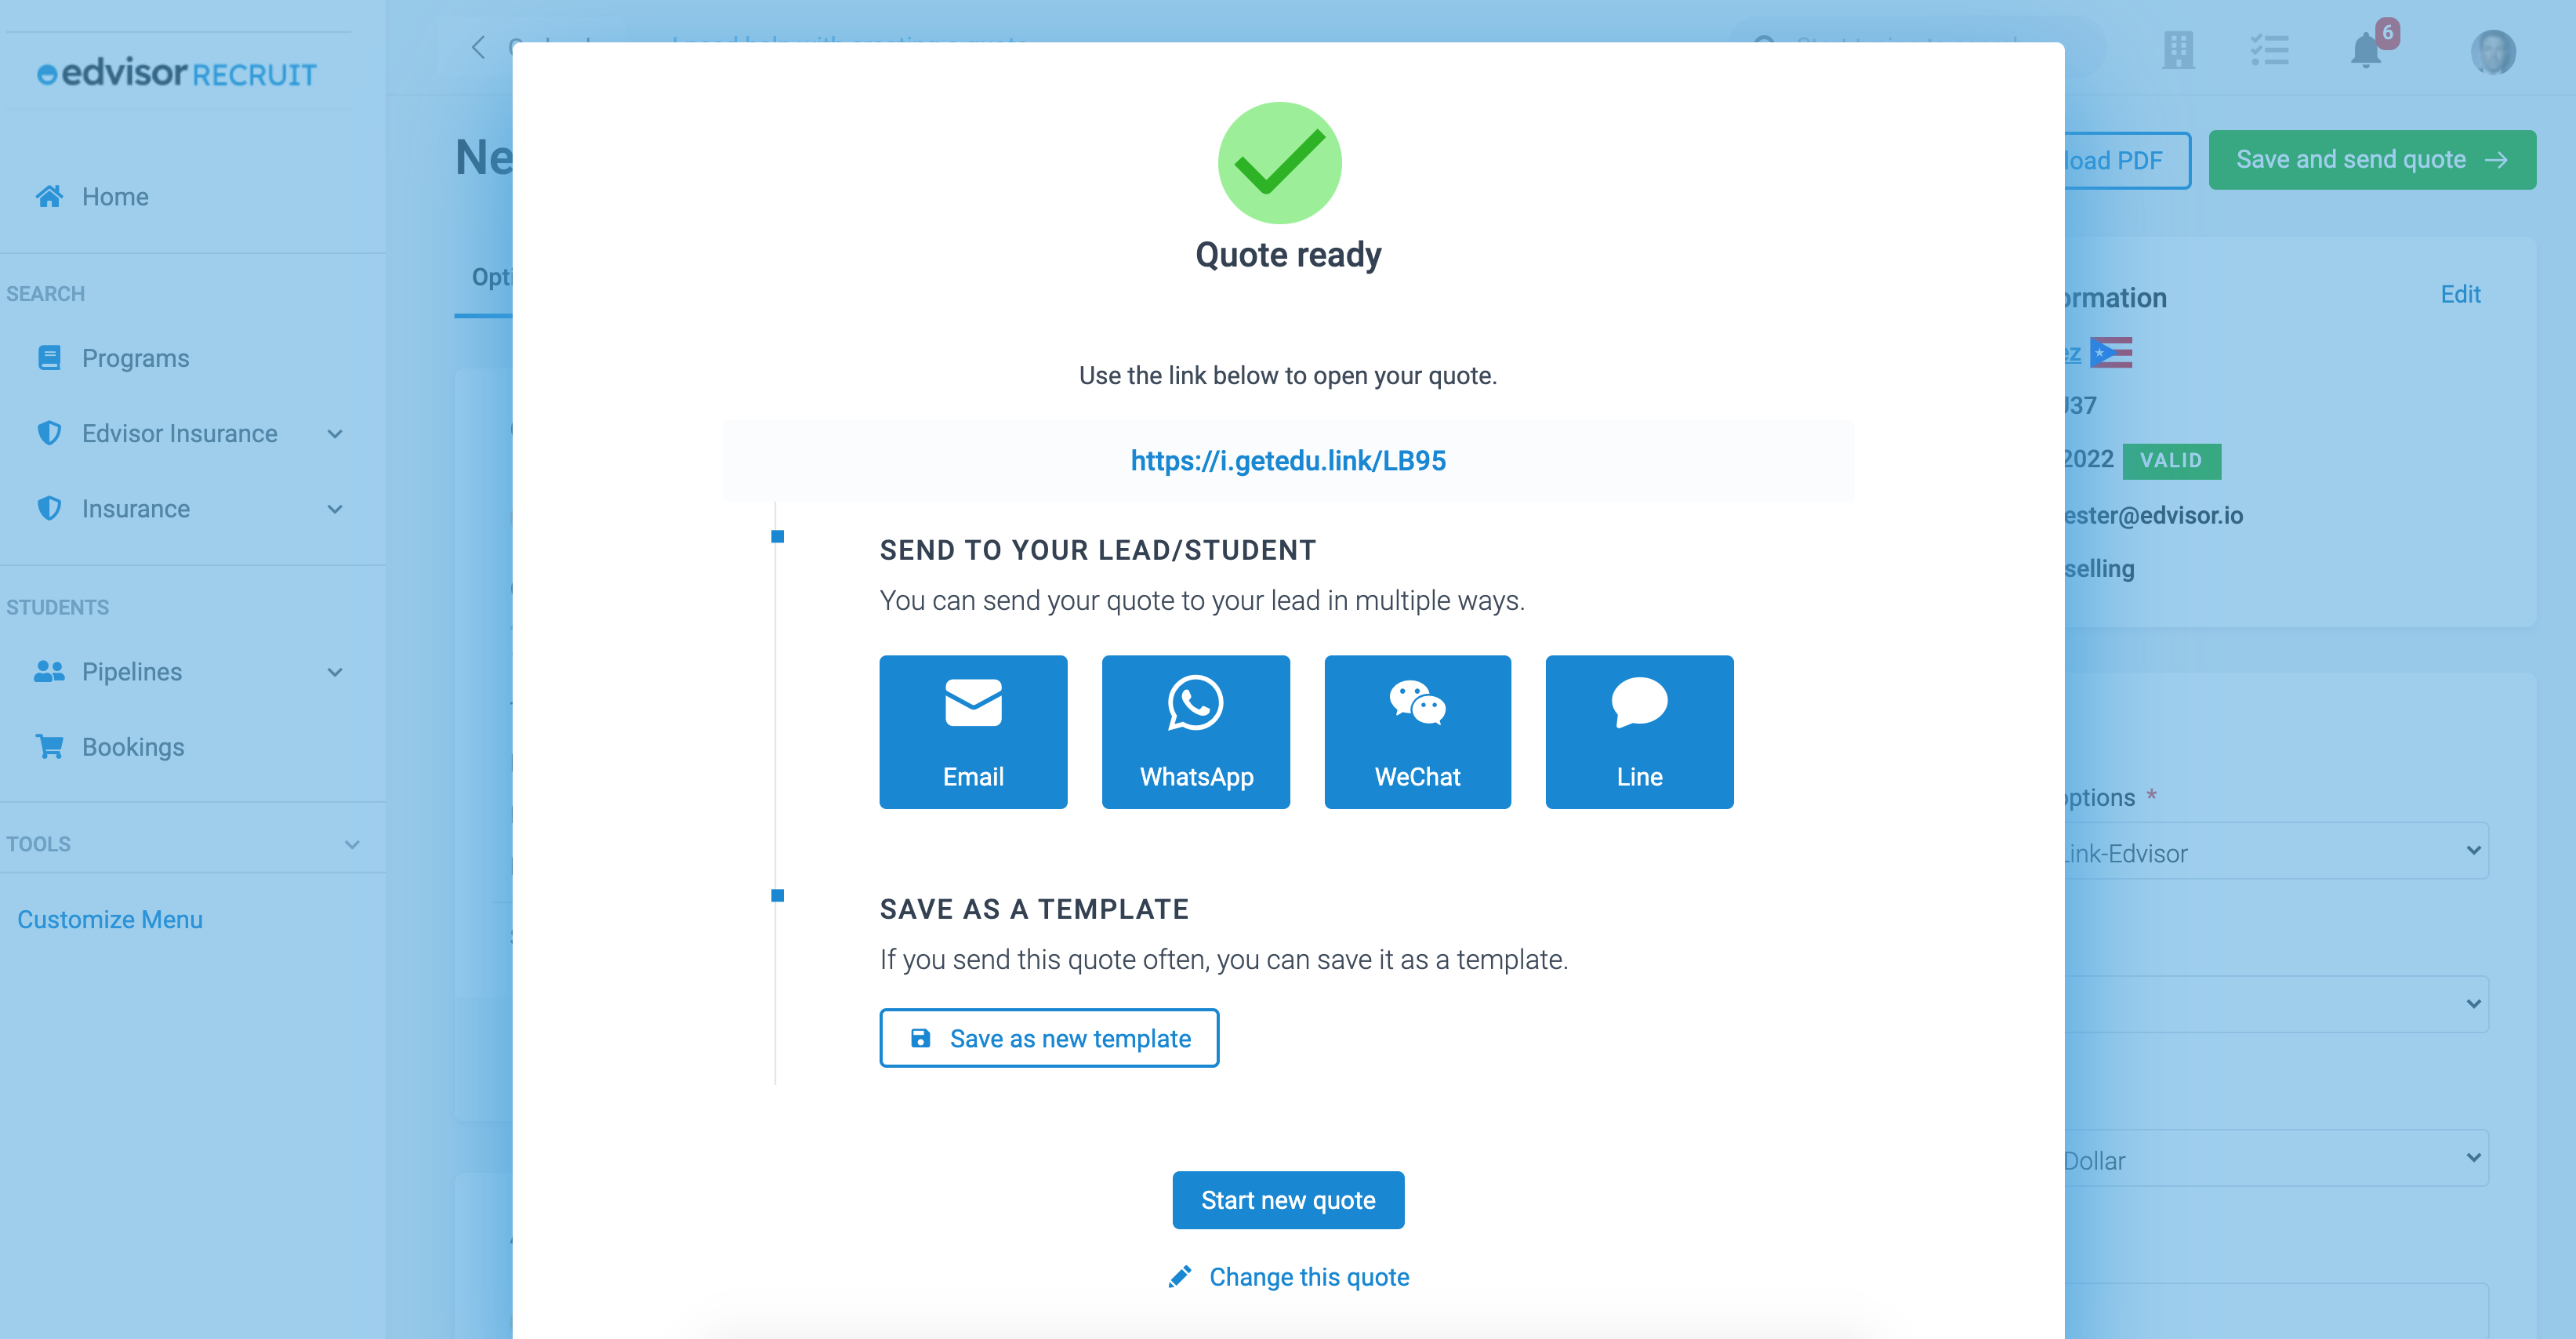
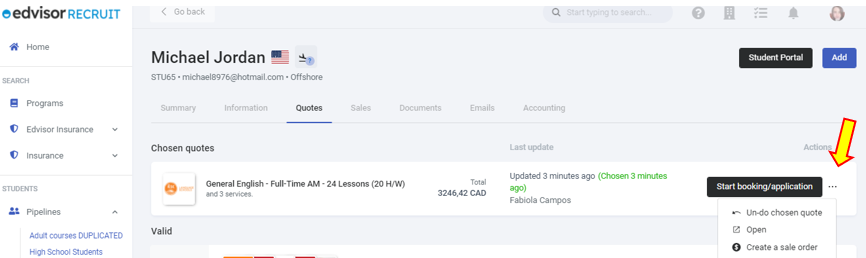
You can also save the quote as a template from here, to be used again by your team. - Quotes now can be Chosen in order to begin a sale order or booking.

- On a chosen quote, expand the sub menu (three dots), and select 'Create a sale order'
NEXT: The Recruit Sales Flow (Part 2): Sale orders and bookings