Here are some a brief descriptions of each of the Add Ons and what they can do. Each of the paid Add-Ons, comes with a "first 24 hours" trial activation period.
There are 3 areas of productivity that Recruit can integrate with: Marketing, Finance, and Database.
Marketing Add Ons

Description: Mailchimp is a marketing tool that can collect and segment contact lists for an email campaign or automating marketing workflows.
How it Works with Recruit: Students created in Edvisor Recruit are automatically copied to Mailchimp.
Requirements: API Key, List/Audience ID
Data Flow: Outgoing synchronization from Recruit only
Example Workflow: Update student pipeline sale status to 'Paid' > Add the student to a mailchimp list for marketing campaignSteps to Setup:
- Goto Company Settings > Add Ons
- Scroll to the 'Mailchimp' add on
- Click on 'Activate'
- Paste the API Key that is provided by Mailchimp (how to generate the Mailchimp API Key)
- If you have a specific list or audience that you want your Recruit leads to be synced, then enter the ID of the list here (optional)
- Map all your fields and save


Description: ActiveCampaign is also a Marketing automation web app that also offer some CRM functionality.
How it Works with Recruit: Students created in Edvisor Recruit are automatically copied (created) to ActiveCampaign
Requirements: API Key, Unique ActiveCampaign URL
Data Flow: Outgoing synchronization from Recruit only
Example Workflow: Include students to your ActiveCampaign workflow automatically when a Student reaches a specific Pipeline Status
Steps to Setup:
- Goto Company Settings > Add Ons
- Scroll to the 'ActiveCampaign' add on
- Click on 'Activate'
- Paste the API Key that is provided by ActiveCampaign (how to generate the Mailchimp API Key)
- If you have a specific list or audience that you want your Recruit leads to be synced, then enter the ID of the list here (optional)
- Map all your fields and save
Finance Add Ons

Description: Xero is a popular cloud-based financial tracking tool for any business
How it Works with Recruit:
- Send any invoice from Recruit to Xero (creates a replica invoice in Xero).
- Once sent, updates to invoices in Xero, will now synchronize with the invoice in Recruit.
- Note: Changes and updates to invoices in Recruit, will NOT update Xero - the updates only go from Xero to Recruit. It is highly recommended once an invoice is sent to Xero, you continue to make invoice changes in Xero only.
Requirements: Xero login credentials
Data Flow: Two way data sync, with restrictions
Example Workflow: Update invoices in EduLink when linked invoices in Xero are updated.
Steps to Setup:
- Goto Company Settings > Add Ons
- Scroll to the 'Xero' add on
- Click on 'Connect to Xero'
- Click on the '+' symbol to connect your Xero organization and Edvisor Recruit offices
- Then, map your invoice type (Settings for selected offices) to the Xero account you want to send invoices to
- Save
- Now, you can send any invoice to Xero, by clicking the 'Send to Xero' icon, or with a single button, sync all related invoices from Xero to Recruit (see below)


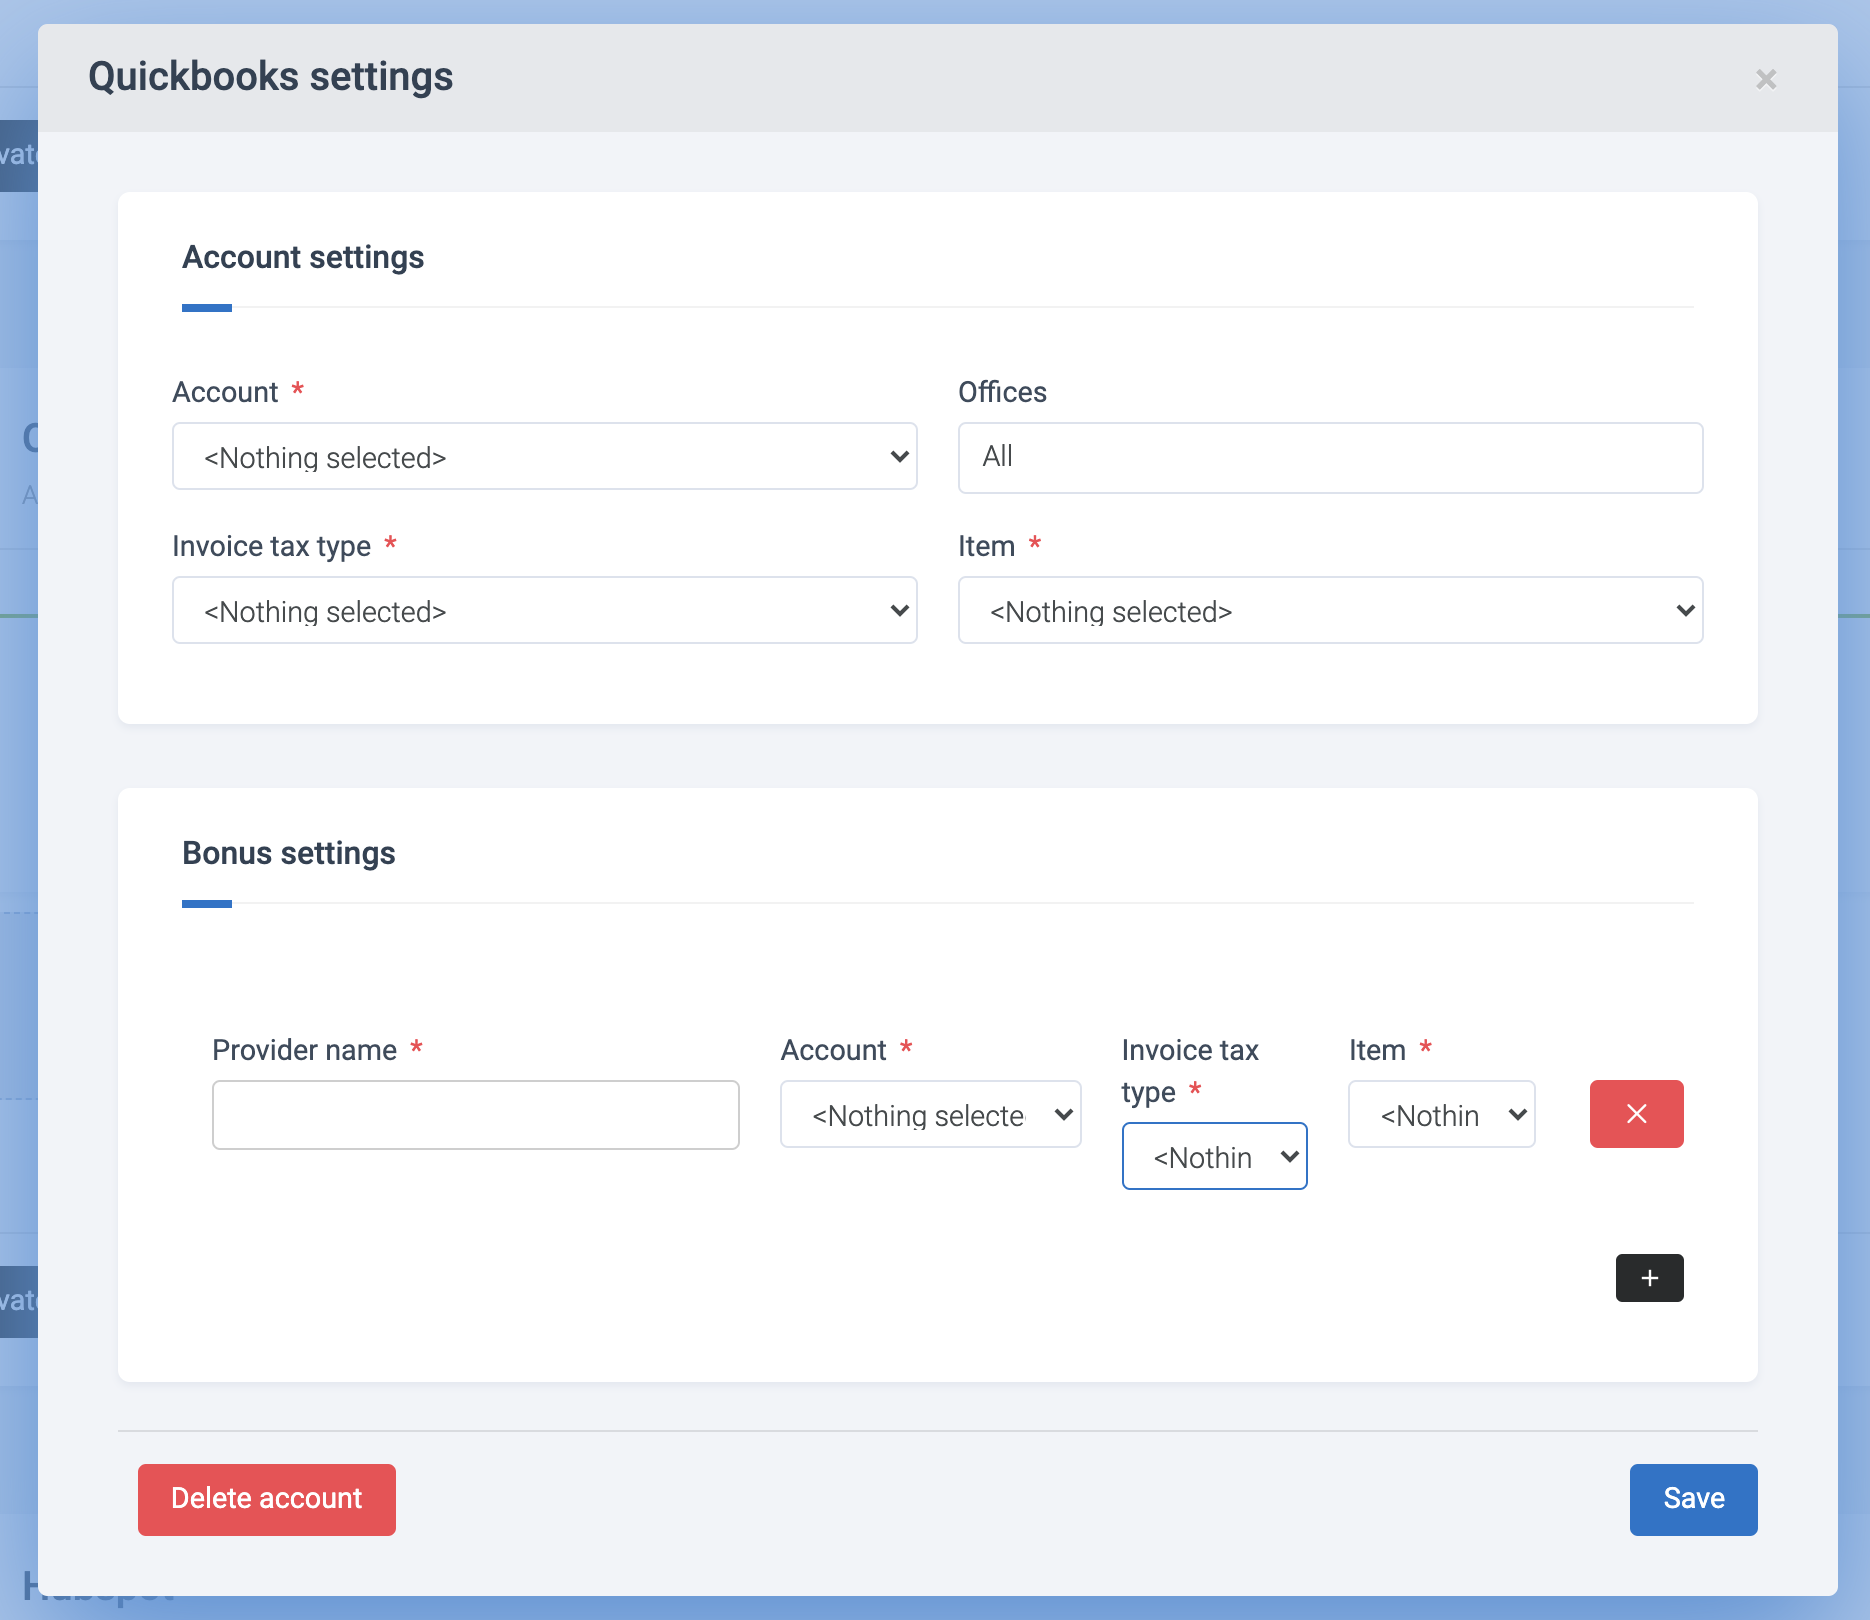
Description: Quickbooks is a popular cloud-based financial tracking tool for any business
How it Works with Recruit:
- Send any invoice from Recruit to Quickbooks (creates a replica invoice in Quickbooks).
- Once sent, updates to invoices in Quickbooks, will now ynchronize with the invoice in Recruit.
- Note: Changes and updates to invoices in Recruit, will NOT update Quickbooks - the updates only go from Quickbooks to Recruit. It is highly recommended once an invoice is sent to Quickbooks, you continue to make invoice changes in Quickbooks only.
Requirements: Quickbooks login credentials
Data Flow: Two way data sync, with restrictions
Example Workflow: Update invoices in EduLink when linked invoices in Quickbooks are updated.
Steps to Setup:
- Go to Company Settings > Add Ons
- Scroll to the 'Quickbooks' add on
- Click on 'Connect to Quickbooks'
- Click on the '+' symbol to connect a new Quickbooks account - you can connect as many Quickbook accounts as you wish
- Then, select the specific Quickbooks account to map to one, some or all, of your Offices that you want to send invoices from
- Add the tax type, item, and any bonuses by provider - then click 'Save'
- Now, you can send any invoice to Quickbooks, by clicking the 'Send to Quickbooks' icon, or with a single button, sync all related invoices from Quickbooks to Recruit

Database Add Ons

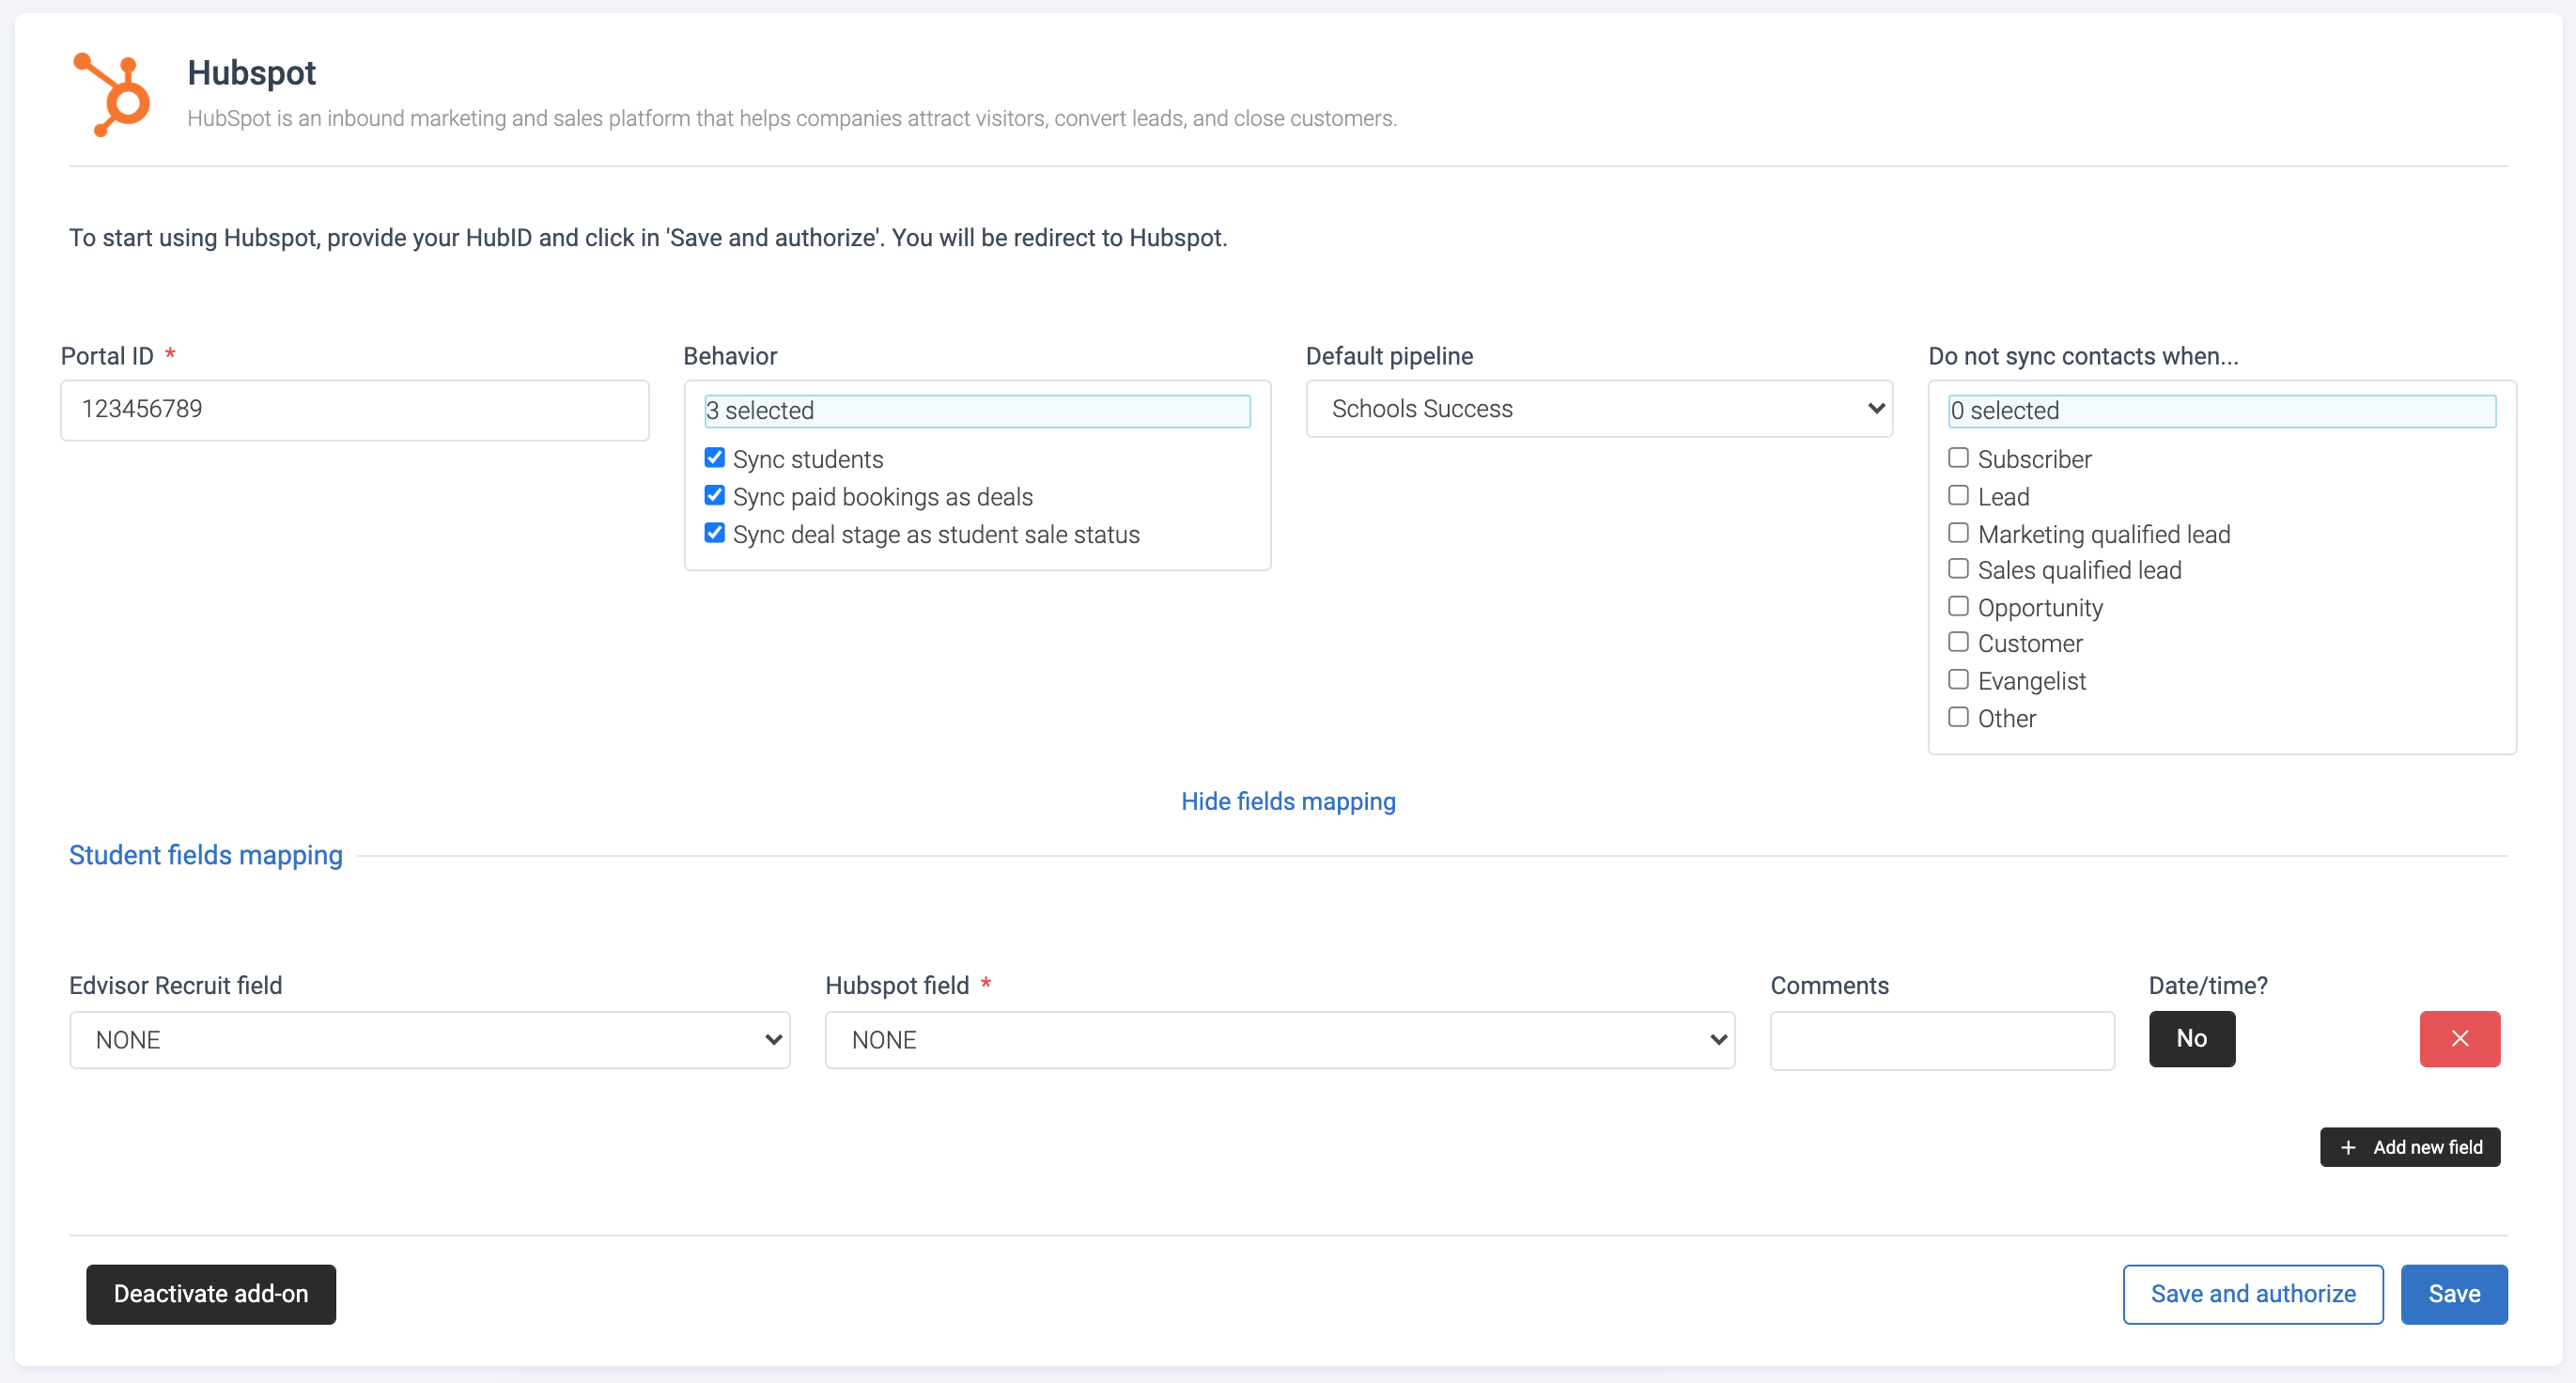
Description: Hubspot is a powerful business tool that combines marketing, sales, and support functionality.
How it Works with Recruit: Synchronizes students that you are tracking in Recruit with your Hubspot database. There are three main synchronization functions available:
- Sync students (real-time update of properties between Recruit and Hubspot)
- Sync paid bookings as deals (sync only paid bookings from Recruit); [unsupported]
- Sync deal stage as student sale status (deal stage movement in hubspot as they are moved in pipelines on Recruit) [unsupported]
Requirements: Hubspot Portal ID
Data Flow: Two-way synchronization
Example Workflow: When a student in Recruit is moved to Pipeline stage 'Paid', the associated deal will also move to the respective deal stage named 'Paid'
Steps to Setup:
- Goto Company Settings > Add Ons
- Scroll to the 'Hubspot' add on
- Click on 'Activate'
- Paste your Hubspot Portal ID (you will be asked to verify the account in a popup)
- Confirm the connection (you will be asked to login to Hubspot)
- Select a 'Behavior', 'Pipeline', and status restrictions (optional)
- Map all your Recruit fields with Hubspot and hit 'Save and Authorize'

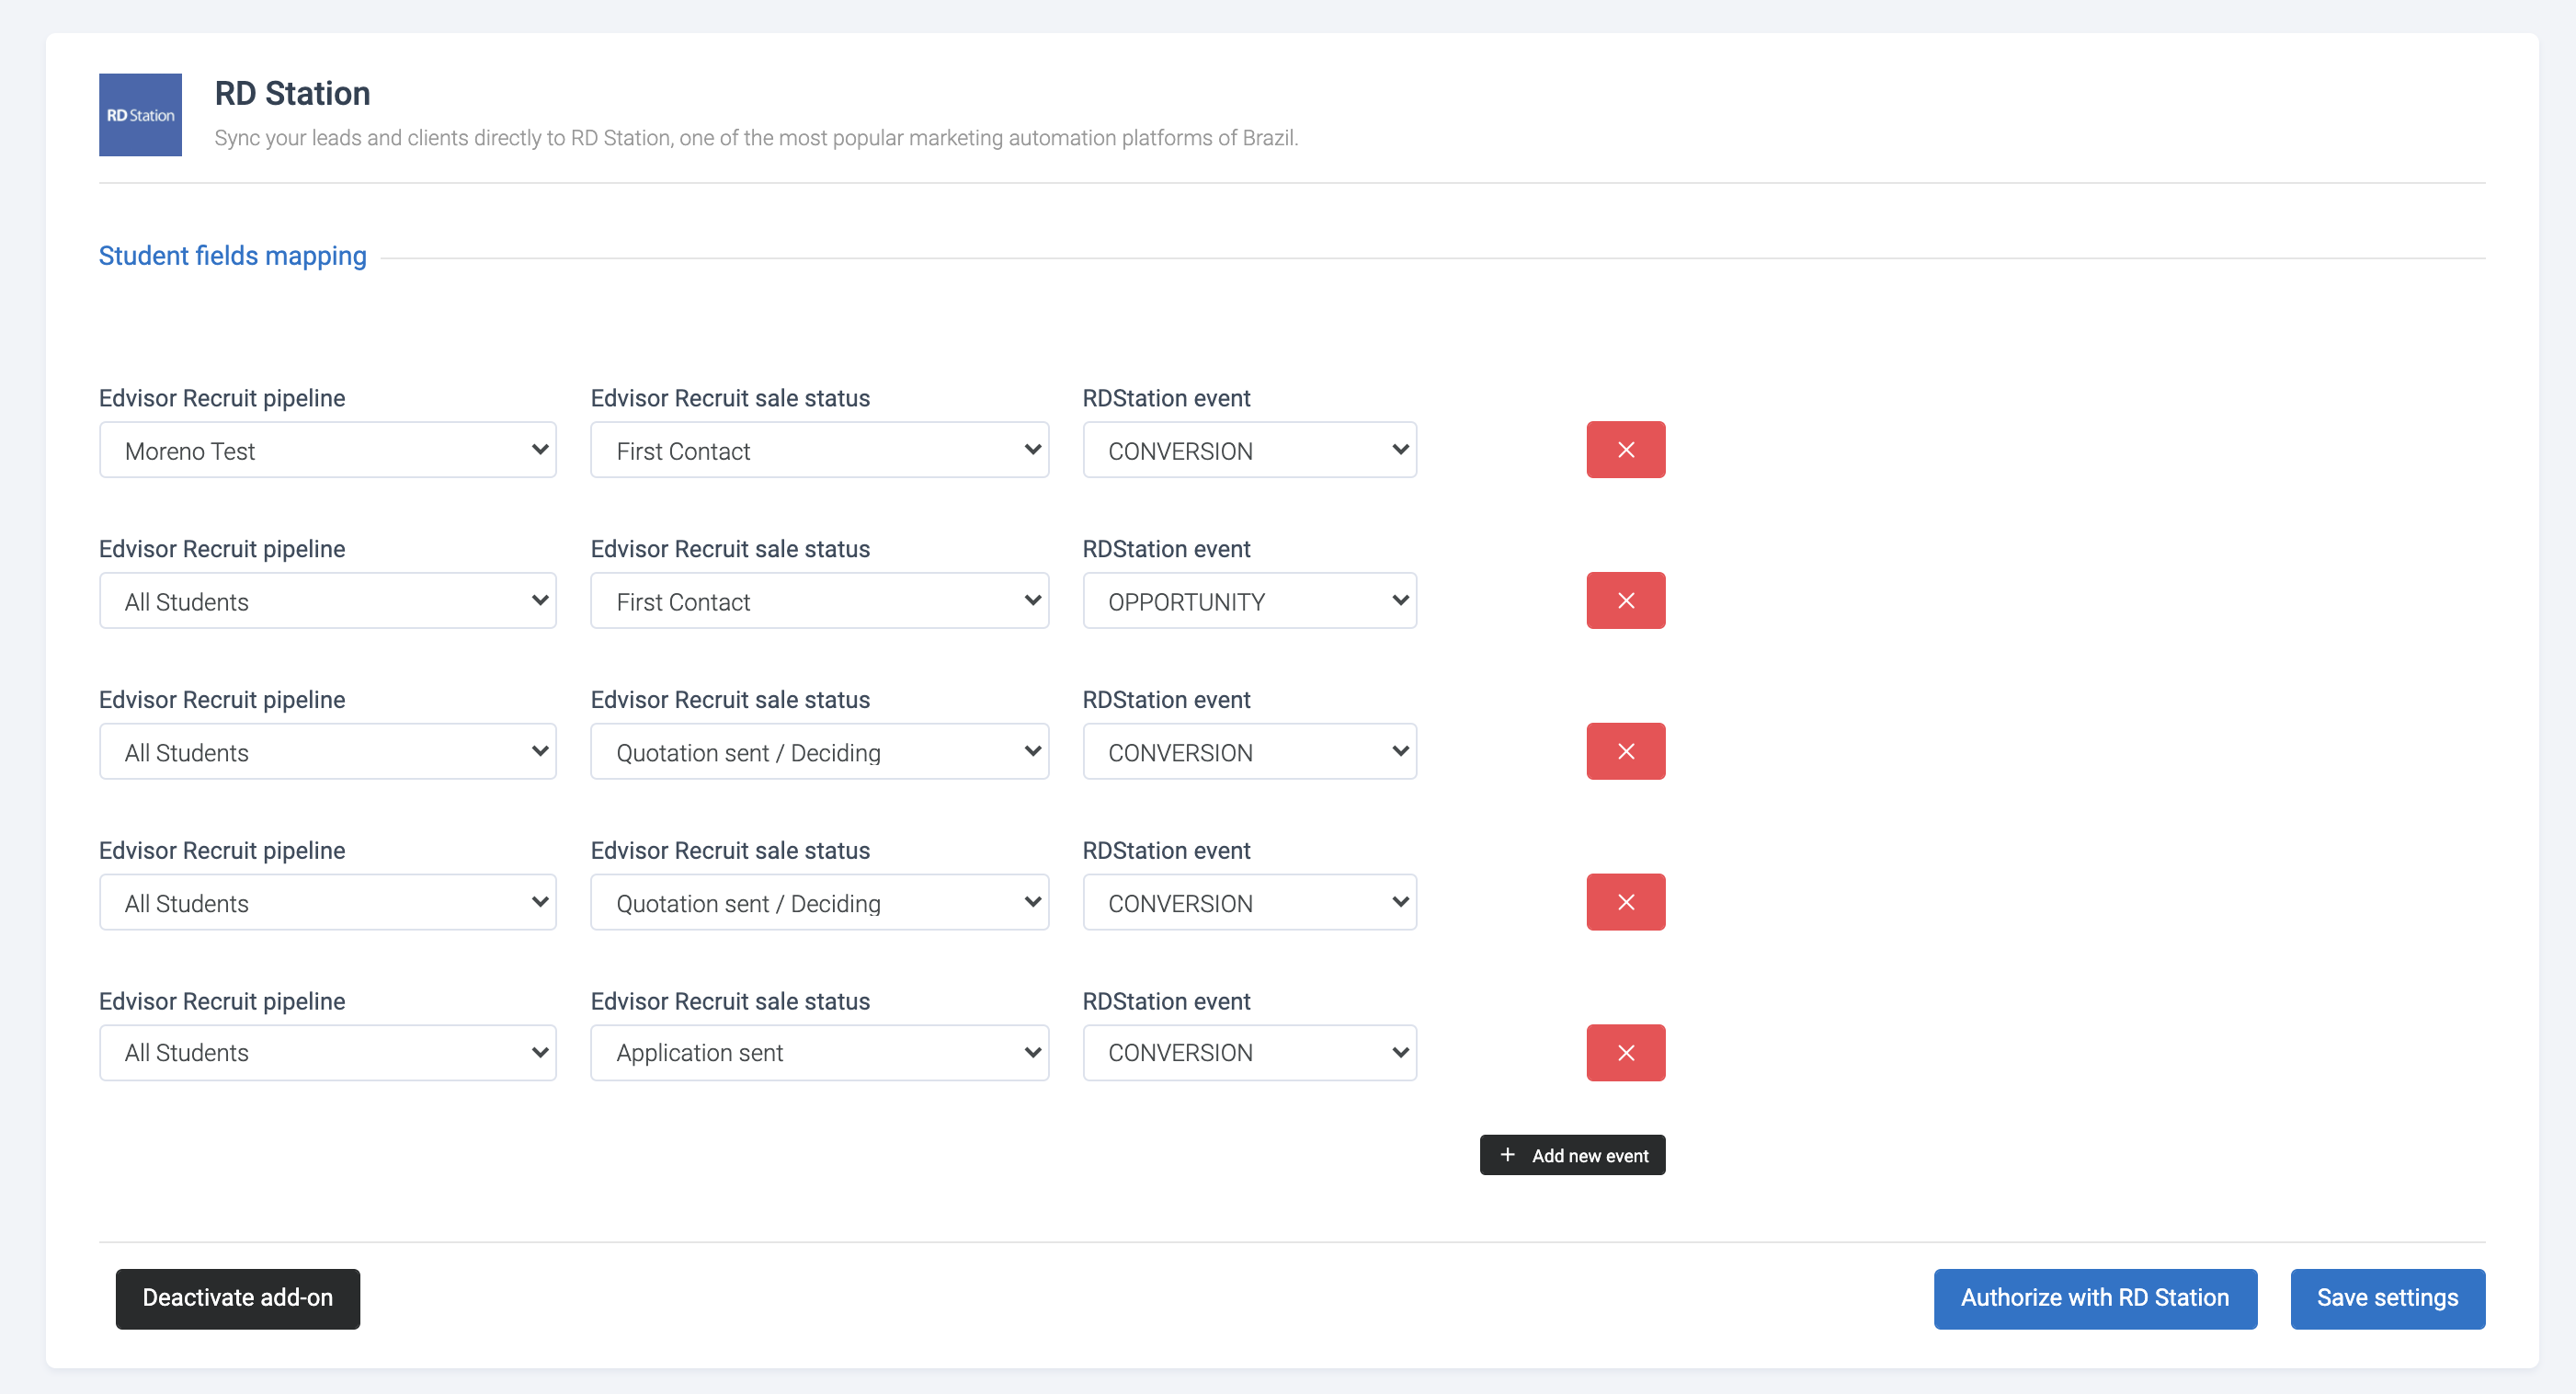
Description: RD Station is a powerful business tool that combines marketing, sales, and support functionality.
How it Works with Recruit: Synchronizes student statuses based on Pipelines in Recruit. RD Station is limited to sending and updating students in RD Station as 'CONVERSION' or 'OPPORTUNITY' only. New students created in RD Station from Recruit will only carry over the following fields: Name, Email, Phone number, Tags, and Country
Requirements: RD Station Login
Data Flow: Two-way synchronization
Example Workflow: When a student in Recruit is moved to Pipeline stage 'Paid', the associated student in RD Station will be set to 'CONVERSION'
Steps to Setup:
- Go to Company Settings > Add Ons
- Scroll to the 'RD Station' add on
- Click on 'Activate'
- Map the Recruit Pipeline and statuses to the RD Station status that should be applied.
- Click on 'Authorize with RD Station'
- Login to RD Station (popup window)
- Hit 'Save Settings'
Additional Integrations
If you are looking for more customized integrations, or have a specific app in mind, there may be a possibility to explore and provide a solution for you - via API access and webhooks setup. Contact your account manager, or the Support Team to find out more.