- Create custom courses or programs
- Add fees, pricing and start dates
- Manage, edit or delete your custom courses
⚠️ Custom courses can only be added to custom schools. Ensure you create a custom school first before adding any custom courses.
You can do this from the Add Schools section:
🔹 Create custom courses or programs
Once your school profile is created, it's time to add courses or programs.
- Click on
Products>Coursesfrom the right side menu of your Edvisor platform. - Then, click
Create New - Select your Custom School from the list (this will assign your course to that specific school)
- Enter the course name, and fill out all the details.
- Once done, save your new course.
⚠️ The information in this tutorial is specifically for creating courses for your custom schools (schools that are not on Edvisor).
To create custom courses for existing Edvisor schools, please follow the same steps outlined here.
🔹 Add Fees, Pricing and Start Dates
Once your school profile and course are created, the most crucial step is to add the start dates, fees, and pricing.
👉 How to add start dates
Start by adding the course start date/s.
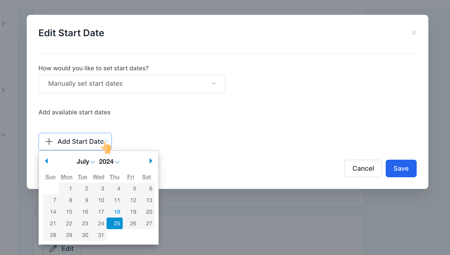
Open your custom course and scroll down until you find the Start Dates section. Click on the pencil icon to add or edit your start dates.

There are two ways to set your start dates:
-
Manually set start dates: Select this if there is a unique start date for this course or program, then, simply select the date from the calendar and save your changes.
- Create a Pattern of Dates: If your course has multiple start dates, such as starting every Monday, you can easily set this up.
 Select Create a Pattern of Dates
- Choose whether the pattern is based on a specific weekday or days of the month
- Indicate how often these pattern should be repeated.
👉 How to add fees
Fees must be created first from the fees section of Edvisor and then added to your course from the fees block inside your course or program.
- Navigate to
Products>Feesfrom the right side menu of your platform. - Then, click on
+ New Feeto add a new fee. - Enter all the necessary details, you can learn more in this article.
⚠️ Ensure that the “Assign this fee to a custom school” option is checked and that your Custom School is selected. If this isn’t done, the fee will not appear in your custom course.

Once created, go back to your custom course, scroll down until you find the fees section.
Click on the pencil icon to edit. From there, simply select the fee from the list to add it to your course.

👉 How to add pricing
Within your custom course, you’ll see a pricing section. Click on the pencil icon to add your pricing.

There are 3 types of pricing you can add for your courses:
-
Simple: A fixed rate regardless of the course duration. For example, $200 per week for any duration.
-
Flexible Duration: Different prices depending on the program length. For example, $200 per week for 1-4 weeks, and $175 per week for 5+ weeks.
-
Fixed Duration: A set price and duration. For example, $2000 for a 4-week course.
By following these steps, you can ensure that your Edvisor platform is comprehensive and includes all the institutions you work with, providing your students with a wide array of options.
Don’t forget to make your course visible once it’s ready so your counselors can start using it!

⚠️ As an agent, you are fully responsible for the accuracy of the pricing and information you upload for your custom schools.
While adding custom schools allows you to work with a broader range of institutions, we encourage inviting these schools to join Edvisor to simplify the management of pricing and information.