To start, go to the Product and Add-Ons section in your school menu bar.

In the top right corner of the Product and Add-Ons section, you will find the button + New Products or Add-ons, click and select "Course" to start creating your course.

1. Basic Settings of the Course
Start by creating the following:
- Course Name (used on student proposals)
- Select a course Category
- Add a new course Description
Once completed, your course basic settings will look like this:

'Save' this section and move on to create Additional Settings:
- Course Minimum and Maximum duration
- Student Minimum and Maximum age to enroll in the course
- English Level Requirement for the course
- Limit Availability by Date (Studies must start and end within this date range)
Additional settings example:

In the example above the General English (20 H/W) course is only available for students between 16 and 45 years old. The minimum duration of the course is 2 weeks and students can only book up to 52 weeks.
Finally, the course is available for beginners onwards.
2. Create the course price
In the pricing option > click the Edit button

You will find the options "Use price template" and "Enter custom prices"
If you have previously created a price template including the pricing for your new course, all you have to do is select it. If not, continue with the next steps:
Click on the option "Enter custom prices"

You have the following options on how to create the pricing for your new course:

- Simple pricing: Used when you have a weekly/Monthly/Yearly price, the same price regardless of the duration.
Example: $200 per week - If an agent quotes the course for 4 weeks the price will be 4x$200= $800.
- Flexible pricing: Bookable for a range of durations when the prices are in tiers/by range.
Example: If an agent quotes the course for 6 weeks the price will be 6x$200 = $1200.
- Fixed Pricing: When the course is sold with specific durations.
Tip: By using fixed pricing you won't have to set a minimum and maximum duration in your course additional settings, the duration of the course will be fixed by the price template.
3. Create additional fees
In the fees option > click the Edit button
If you have previously created a fee that applies to your new course, all you have to do is select it. If not, continue with the next steps:
> Click + Add Fee

You will need to start by creating the following:
- Fee Name
- Fee Type
- Add the new fee description

If it is a one time, all you have to do is create the price of the fee:

If it is a fee that is charged based on the duration of the course, you can select the option "Repeat" and the number of times it should be repeated:

Example: if the course is booked for 5 weeks, the price of the fee will be 5x$10 = $50.
4. Create the start dates of the course
In the start dates option > click the Edit button
You will find the options "Use School Calendar" and "Enter Custom Start Dates"
If you have previously configured your school calendar, all you have to do is select it. If not, continue with the next steps:
Click on the option "Enter Custom Start Dates"

Under the action "How would you like to set start dates?" you will find the options:
- Create a pattern of dates: you have the options to set the start dates by days of the month or days of the week.

In this example, the course is available every Monday.

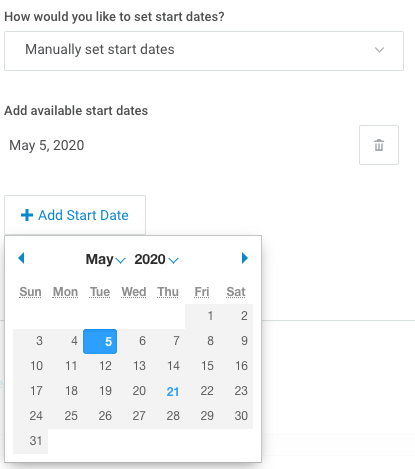
- Manually set start dates: you can manually include the available start dates using the calendar for your course.
5. Set your course available for your partner agencies
The final step is to make this product visible to your partner agencies.
You will find the section "Visibility" in the top right corner of the course settings:

Click on the button to make your course visible:

Congratulations! You have completed your course