Edvisor Recruit´s way of restricting access is very simple: for each user, you can assign "roles", and this role will be used to show/hide features and to allow/block changes to your data. You can set very specific and granular roles or pre-defined "major roles" that provide the most common access to a specific user, e.g. you can tell Edvisor Recruit exactly what your accountant should have access to.
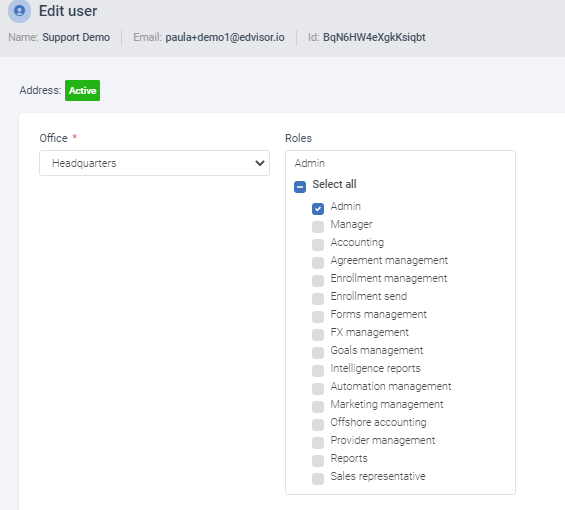
To change the roles of any user, hover the mouse over the settings icon on the top-right corner, click on "Company Settings", then choose "Offices & users", and click on the user you would like to change the roles.
Roles explained
Below we explain each role and what it allows you access to:
Admin: By far the most powerful role. Administrators of the system are able to change any and every setting, preference, data and credit/debit card of the system. Only specific people should have "admin" access. The least the better.Manager: With access similar to a sales representative, the role "manager" allows a user increased control of the student data:
-
- Remove quotes;
- Transfer students to other organizations;
- See bookings/enrollments from every user;
- List students from different offices, different users and students with no counselors;
- Add/edit/remove email templates;
- Remove a sale;
- Mark an invoice as "approved" or in other words as ready to be paid;
- Send invoices to Xero and Quickbooks;
- List students that were transferred from another organization;
Sales Representative: This is the default role for sales representatives or counselors. They allow:
-
- Add and edit students;
- Add and edit quotes;
- Add sales and edit unpaid installments;
- Send an email to a student;
- Add notes to the student;
- Create and manage tasks (including seeing tasks of other users);
- List and search courses, accommodation, insurance, and services provided by the organization;
- Create payments (this permission can be changed in the system preferences);
- Start, edit and submit bookings/enrollments;
- Create a refund.
-
- Create, edit and remove "Forms" (to learn more about checking our article Using forms to add leads automatically);
- Create, edit and remove marketing templates (email and quotes);
- Create, edit and remove triggers;
- See the "Mailchimp log" if your organization is using this functionality;
- See the "Hubspot log" if your organization is using this functionality;
- See the "ActiveCampaign log" if your organization is using this functionality;
- Agreement management: Allow the user with this role to add, edit and remove agreements.
- Provider management: Allow the user with this role to add, edit and remove providers for your organization.
- Forms Management: Allow the user with this role to add, edit and remove forms.
- Triggers management: Allow the user with this role to add, edit and remove triggers.
- Goals Management: Allow the user with this role to add, edit and remove goals.
- Enrollment management: Allow the user with this role to add, edit and remove bookings/applications.
- Offshore accounting: Can confirm payments made in different currencies and can start international transfers.
- Reports: Allows users to unrestricted report generation.
- Intelligence reports: Allows users to access the "Analytics" section.
How to change the roles of a user?
To change the roles of a user you will have to edit them. To do that, you have to access your profile picture on the top-right corner, access "Company Settings", then click on "Offices and Users", select the office of the user you want to change the role to and then select the new role you want to assign to that user.